Are you looking for Free Bluehost Migration? Website migration is a process in which you transfer your website, including all the necessary files, from one hosting to another. You can do this in two different ways. With the help of the hosting help center (free migration), another uses a file manager and database.
Why free Bluehost migration?
You are running a website, but most of the time, your site is going down or needs help with your hosting service. What should you do? You should contact your hosting service team or your developer friend.
But your friend or hosting service center will keep the Bandwidth and Server Space the same. The majority of the issue is caused for traffic. Are the hosting service team or your friend going to improve the traffic handle capacity? Obviously, no.
So, what is the best step for Bandwidth, Server Space, and traffic handling problems?
Changing hosting will help you. But the problem hosting is excellent and affordable, and I will get free migration service. Before buying or changing hosting, this is the question most people ask themself.
If you look at the screenshot we shared, you can see WordPress recommending you to use Bluehost. This is one of the best hosting for wordpress. That’s why you and we are here.
It’s common; if you will have some favorite hosting or your friends have recommended you, then why Bluehost? Here is why?
Over 2 million websites are using Bluehost worldwide. Easy to use and beginner friendly.
- You can install unlimited websites.
- Website space and bandwidth are unlimited.
- Server uptime up to 99.99%
- You will get free SSL
- No limitation for parked domains and subdomains
- You can protect your website through spam experts and domain privacy.
- Need backup, don’t worry. Most advanced hosting plans are included a backup.
Have you read the title? We have talked about 4 different ways that can be used for WordPress migration for free. First, we will show you how you can do this with the help of the free Bluehost migration process.
In the last 2 processes, we will talk about a universal and an FTP way to use any hosting for free.
Free Bluehost Migration
Point to be noted, if you are in the WordPress.com category, then all the steps we will cover today will fail to work with you. So you have to be the WordPress.org one. We know you are excited to take all the steps, but you should focus on the customer qualification lists before doing this.
- WordPress version should be 4.7 or later.
- The PHP version of your current database should be 7.0 or later.
- Filesize will be 2GB and 40MB database size at maximum.
- If your website is under the subcategory (i.e., sub-directories are not allowed), then you can’t use this free feature.
- Your website needs to be free of malware.
- Last and importantly, only one site (Free Bluehost migration only allows one website)
Let’s cover the free option that comes up with Bluehost hosting. To increase the success rate, don’t skip any parts.
Login to your Bluehost account and then click on “My Sites.”
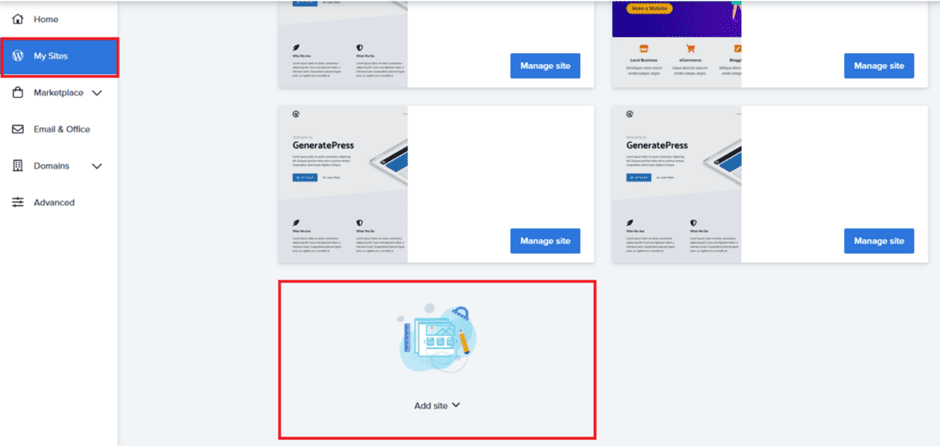
Focus on the bottom, and you will see add site option.
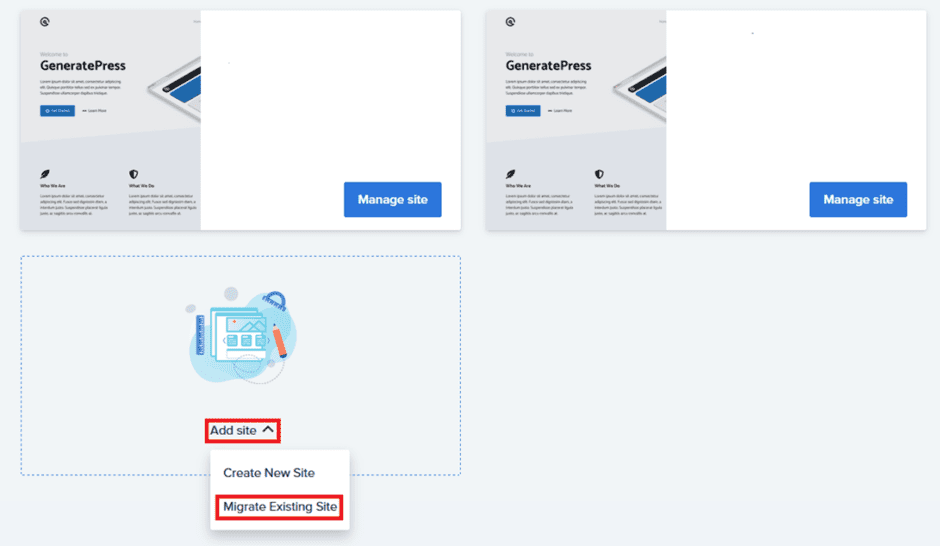
Click on the “Add site”, then “Migrate Existing Site”.
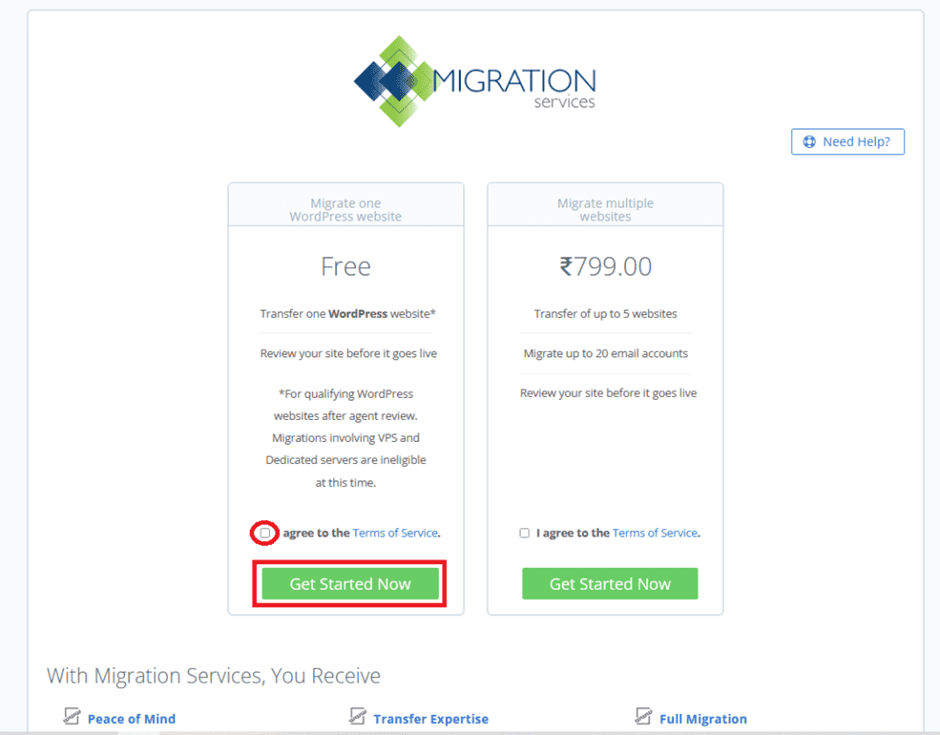
From here, you can start migrating your site. To do that, check the checkbox and click on the “Get Started Now” button.
Note: Bluehost WordPress migration is free for one website.
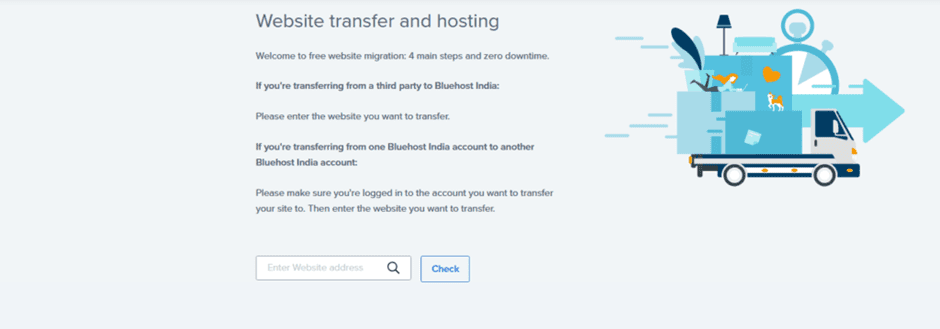
In the next step, enter your website address and click on the “Check” button.
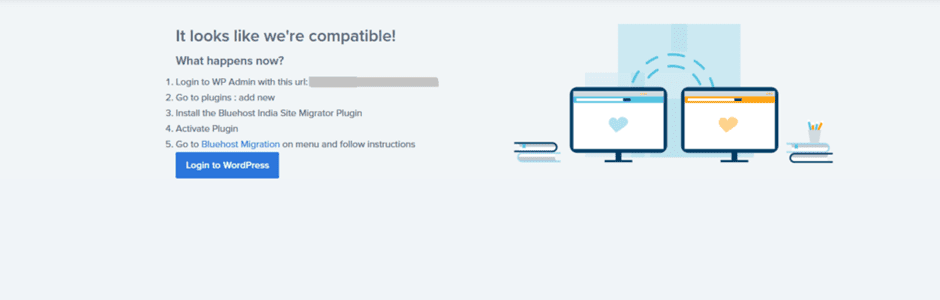
Congratulation! You are compatible with migration. Now login to your WordPress Dashboard that you want to transfer. You can do this by using the green button in the screenshot or your screen called “Login to WordPress.”
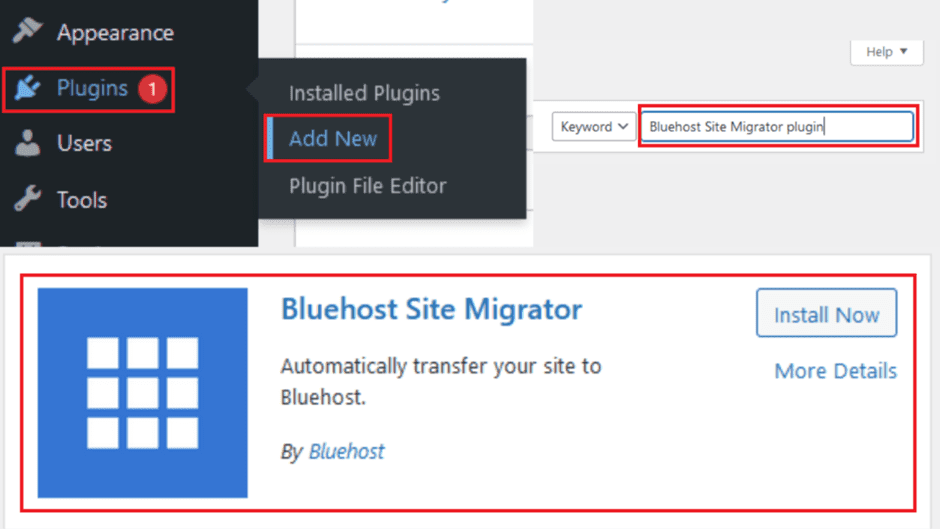
After logging into the WordPress dashboard, install a “Bluehost Site Migrator plugin.” To do that, hover on the plugins section and click “Add New.” Now search for Bluehost Site Migrator. First, install, then activate.
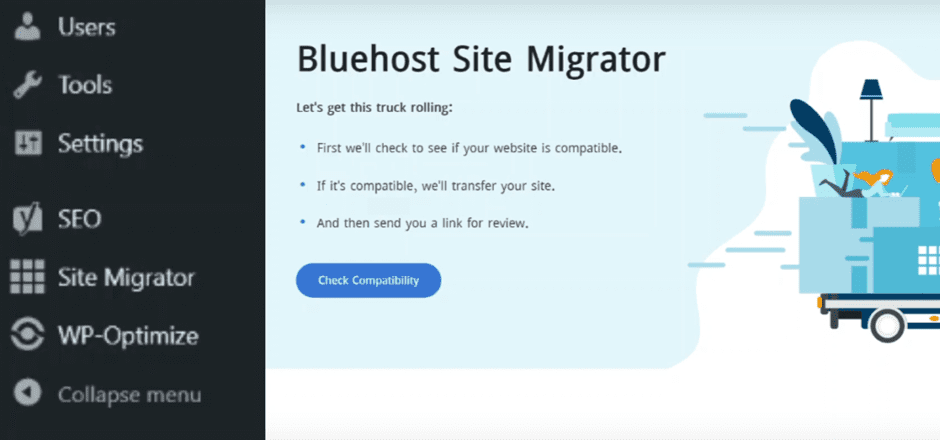
After activating the plugin on the left side, you will see an option called Site Migrator. Just like the screenshot. Click on the Site Migrator, and you will see all the instructions. To check migration compatibility, click on Check Compatibility.
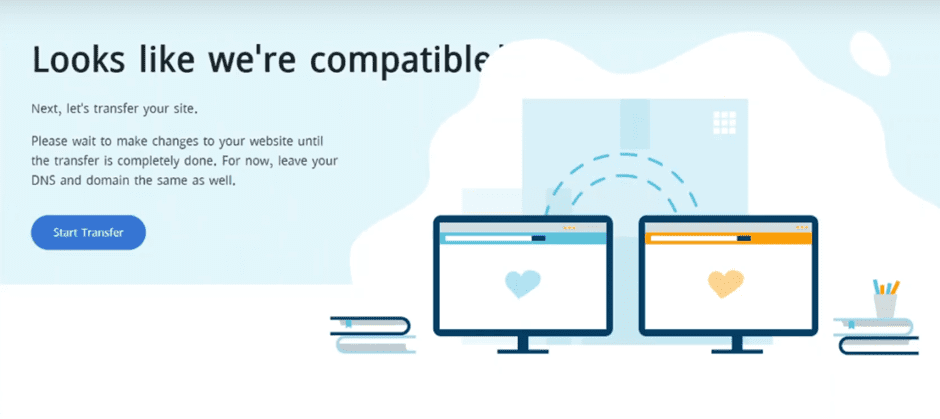
Everything is good, congratulation. Now you can transfer your site to Bluehost. To move your site’s location, click on the start transfer, and this will start moving your site.
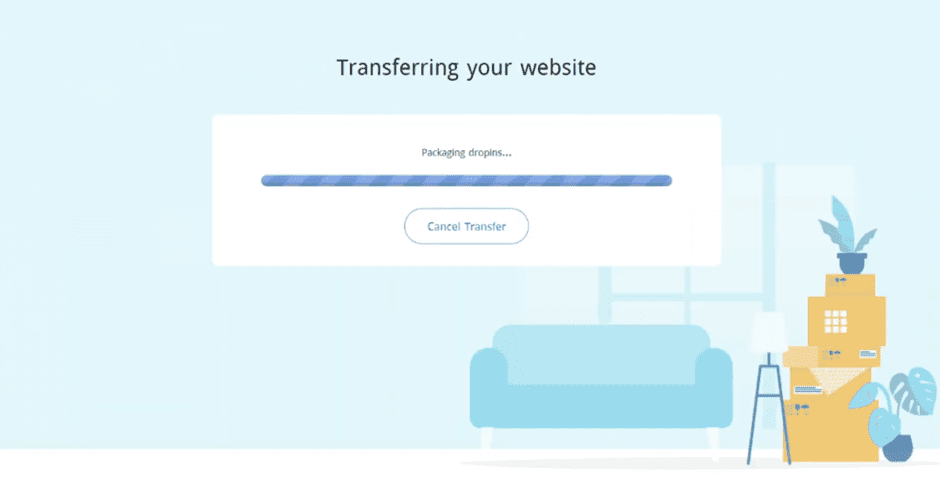
You can see on your screen that your site is transferring.
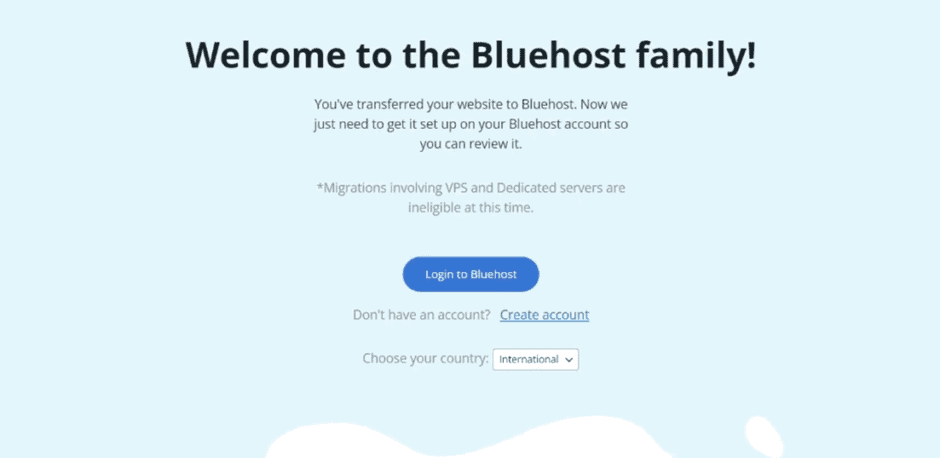
After finishing the transfer process, you will see a Wellcome message and login link, just like the screenshot.
Now login to Bluehost using “Login to Bluehost.”
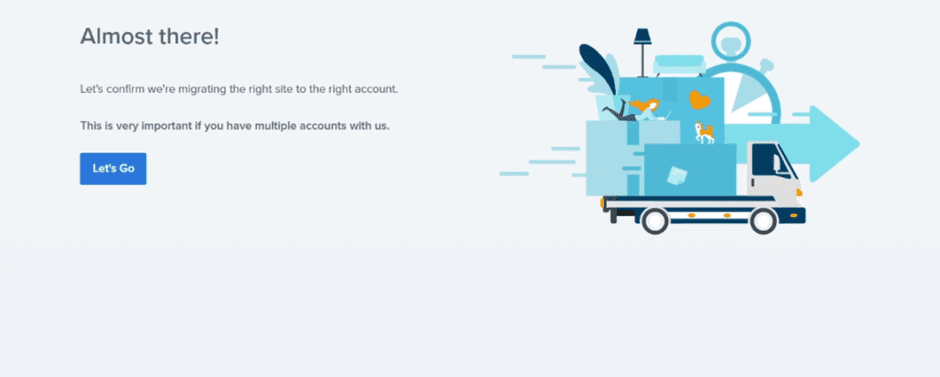
Here we are. To finalize the migration, click on “Let’s Go.”
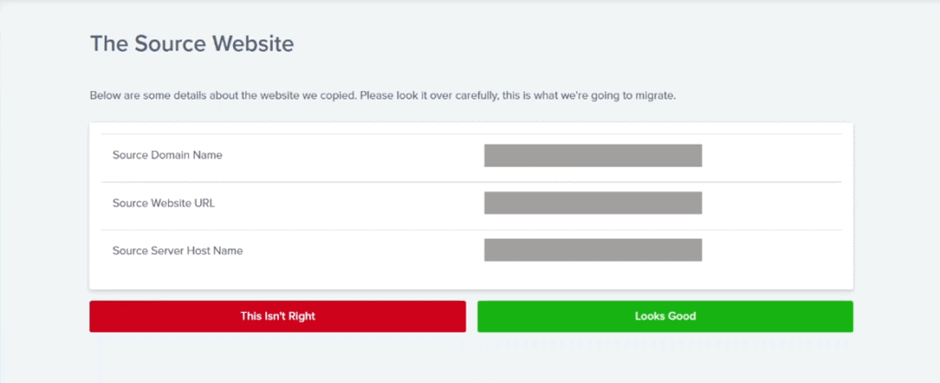
Here you can check your website source; if you have made any mistake, click “This Isn’t Right.” If everything is good and you haven’t made any mistakes, click “Looks Good.”
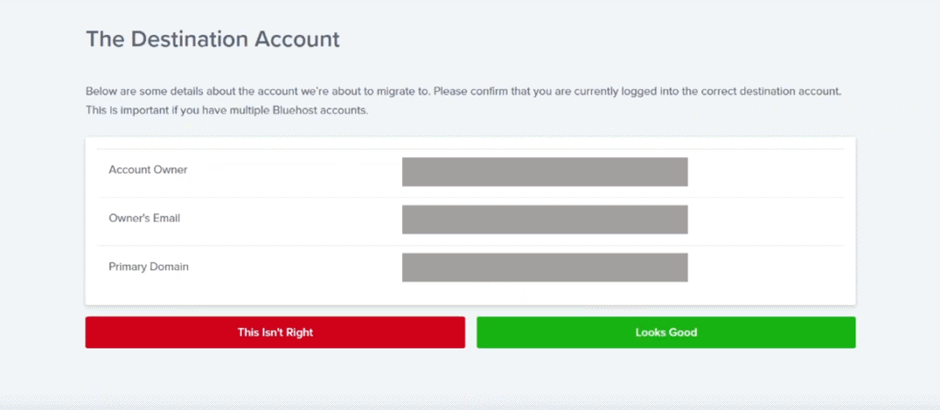
Here check your account details and click on “Looks Good.”
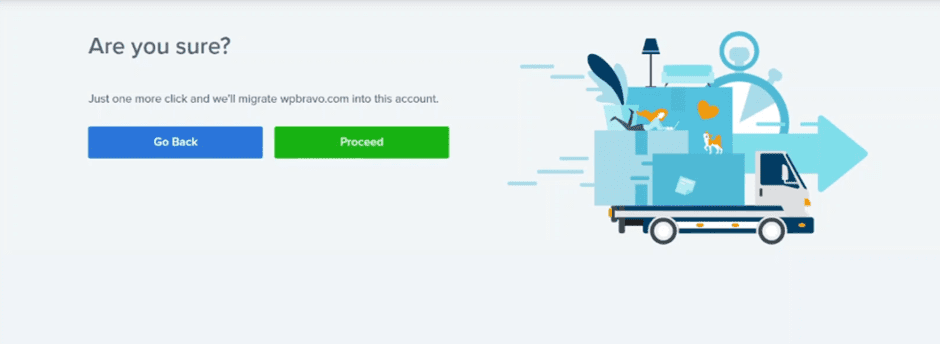
Now you will be asked for permission. Do you want to proceed, or do you want to Go Back? Click on the Proceed.
Congratulation! You have migrated successfully.
Note: Remember to change your Nameserver. Login to your domain provider and change DNS with Bluehost DNS.
Migration using the All-in-One WP Migration plugin
There is another plugin called All-in-One WP Migration that you can use for your site migration. If you are not comfortable with Bluehost Site Migrator plugin, you can use this plugin instead of the Bluehost plugin. Let’s make it happen.
Before using this plugin, you must install a fresh WordPress on your new hosting where you want to transfer your site. When everything is done, you can change the nameserver. This way, your website will be run without any downtime.
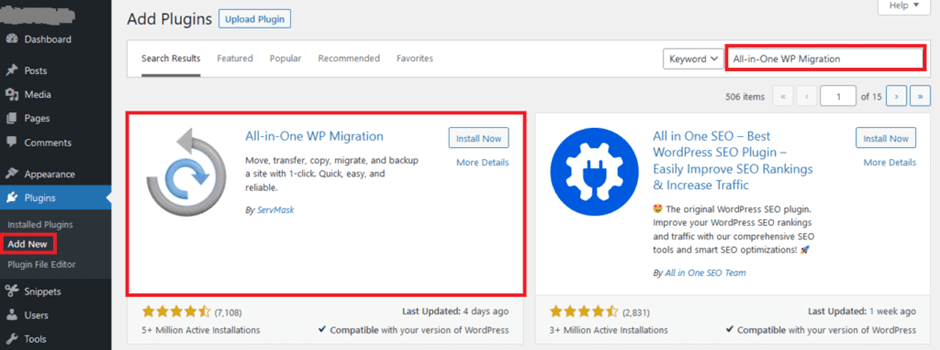
Log in to your existing WordPress site and add a new plugin, “All-in-One WP Migration.” Then activated. If you are here, you already know how to install and activate a new plugin. Isn’t it?
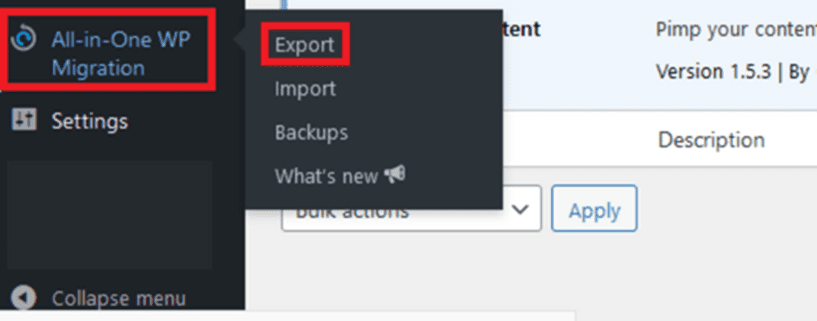
After activating on your left side, you can see the All-in-One WP Migration menu. Hover on the menu and then click on the Export button.
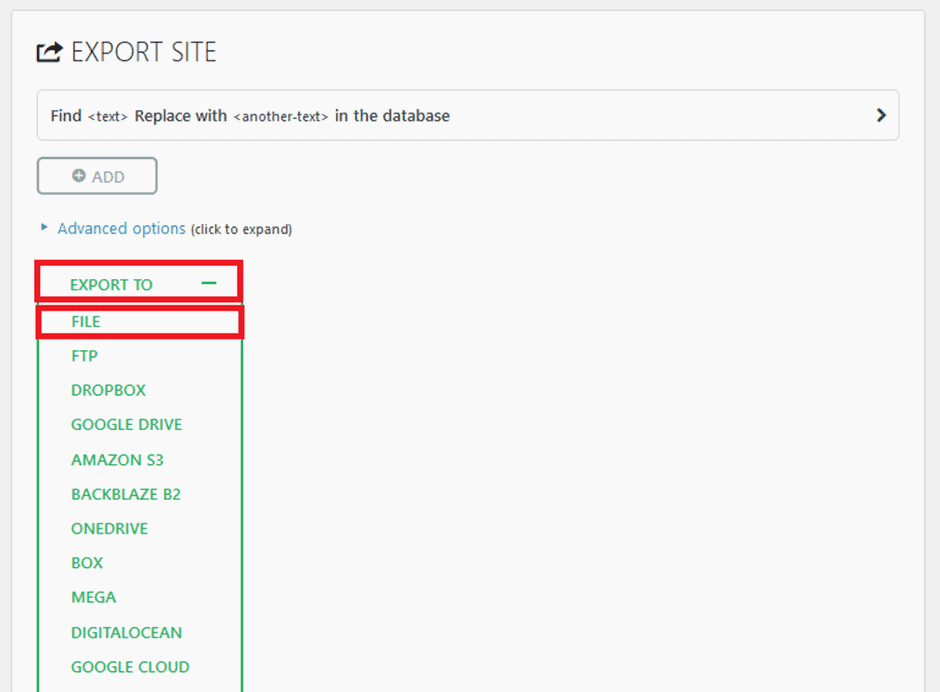
A new menu will appear; you can choose the file option here. But for all of them, a File is the best option. That’s why I am selecting File.
A new menu will appear; you can choose the file option here. But for all of them, a File is the best option. That’s why I am selecting File.
Note: In my case, the dropdown needed to be opened. If you don’t see the dropdown, click on the “EXPORT TO” option and then File.
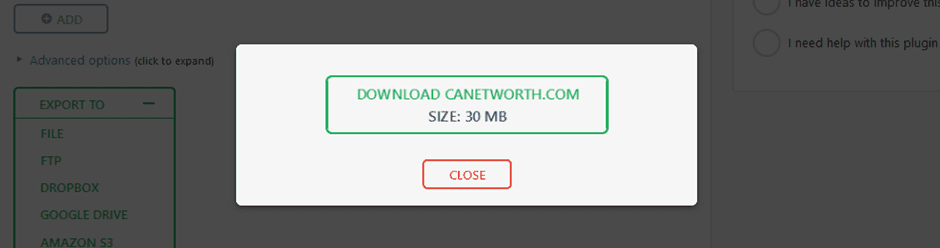
All your File is ready to download. Click on the download option. You have successfully safely downloaded your WP file.
It’s time to move on to our new hosting, where we want to transfer our site.
On your newly installed WordPress, install All-in-One WP Migration and activate it just like before. Follow the same process, but you must click on the import button here.
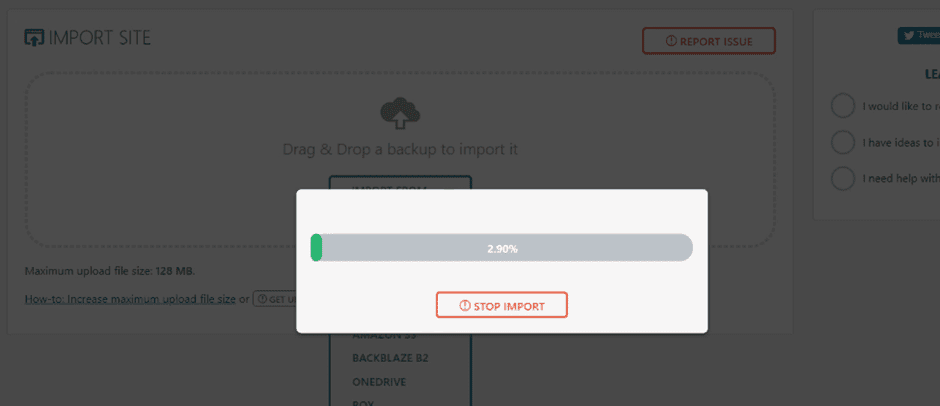
After clicking the import button, you will see a new window. Now click on the “IMPORT FROM” button and then file.
Choose the file that you have downloaded from your existing WordPress. And it will start importing files like the screenshot.
Import is done, and a new pop-up will appear where you have to ask for proceed permission.
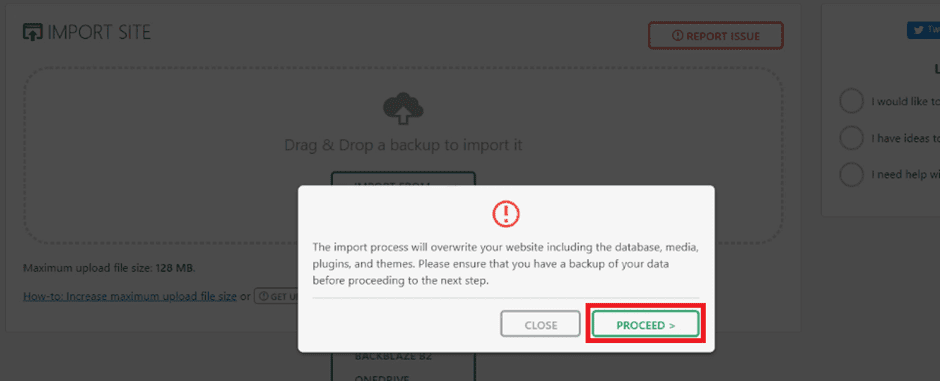
Click on the “PROCEED” button.
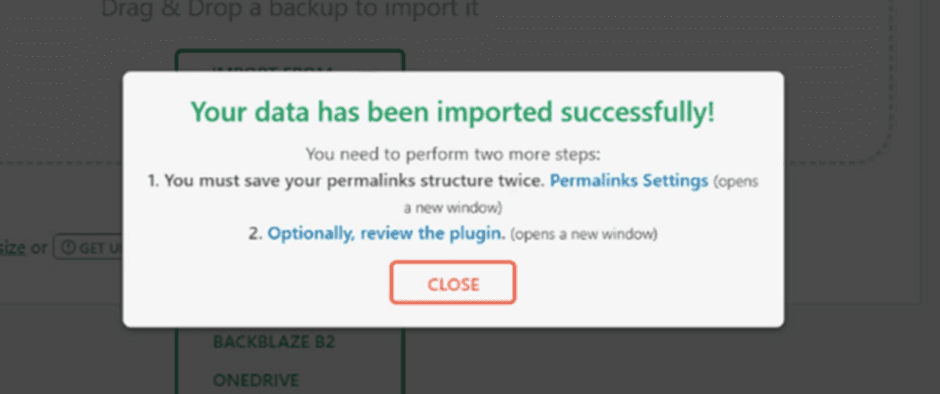
This message tells you to change the permalinks; click on the Permalinks Settings and choose your permalinks settings. You don’t need to be confused; you can follow the screenshot.
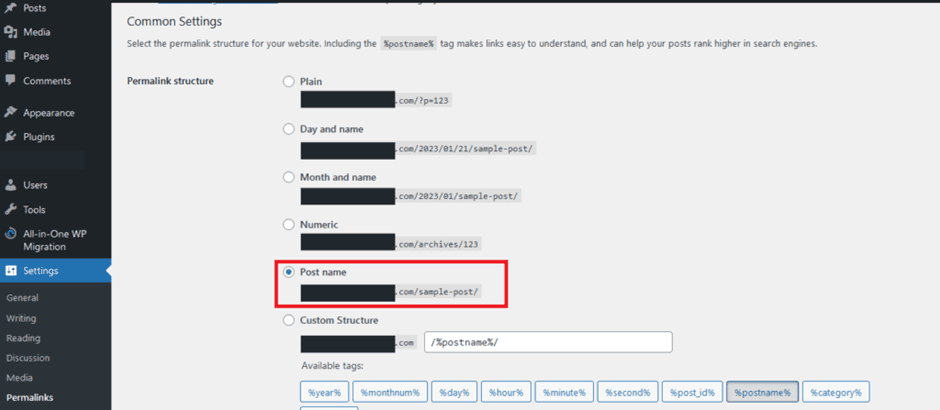
I have chosen the post name option; you can choose a different one. Post name is a better option because your permalinks will be clear.
Before changing the permalink type, you have to log in. Most of the time, people log in to the newly installed website. This doesn’t seem right.
After clicking the Permalinks Settings, a login page will appear. Login using the existing ID ad password, not newly ID and password.
Now scroll down and click on save changes. That’s it.
Everything is done, now you can change your nameserver.
Now it’s time to know about universal steps that you can use for any hosting. Are you excited? Let’s do this.
Why and where will you apply these universal steps?
In the plugin section, you can see there are many limitations. For example, your file and database size is more than 2GB and 40MB. Here you can use these steps. There is no limitation if you use this process. But always remember to take a backup of your site.
Are you ready? Let’s make it happen.
Migration by uploading File Manager and Database on Bluehost
This is a technical part. Before starting, take your website’s backup. You can quickly restore your site through backup files if you need help with any mistake or misconfiguration.
What will we do in this process?
- We will create a database and upload our existing database into our newly created database.
- We will use the file manager.
Login to your current hosting and download the file manager and database. We are going to upload all the files to Bluehost.
How to create a database on Free Bluehost Migration?
Let’s finish the Database task. To do that, Go to the Bluehost dashboard, where you will see the “Advanced” tab. Click on that.
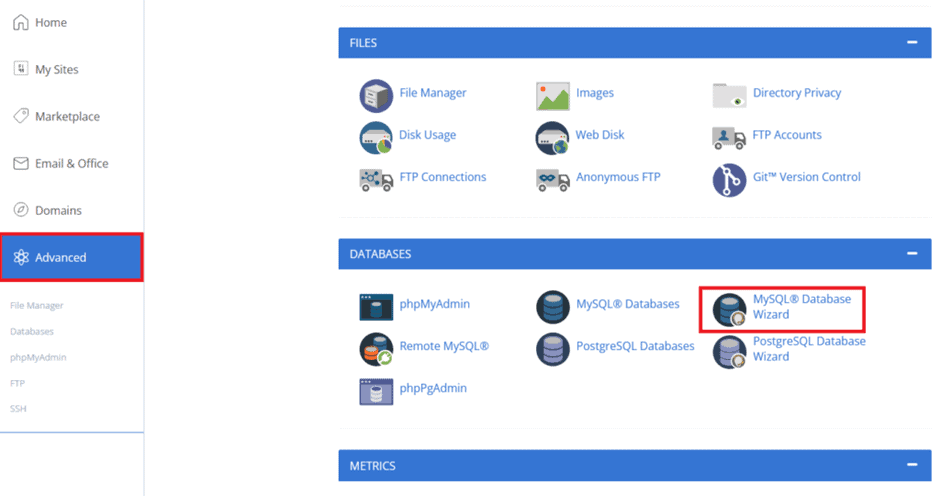
After clicking the “Advanced” tab, scroll down and see a section called “DATABASES.” Under database, you will see “MySQL@ Database Wizard.” Also, you can check the screenshot. Click on the MySQL@ Database Wizard.
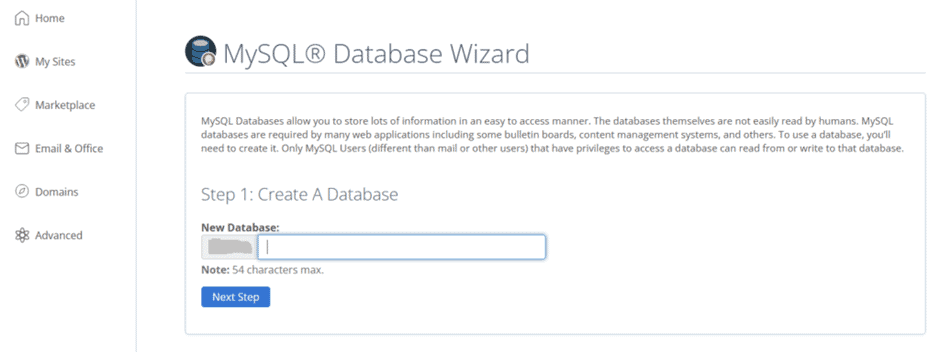
To create a new database, give it a new name you can remember. Now, click on “Next Step.”
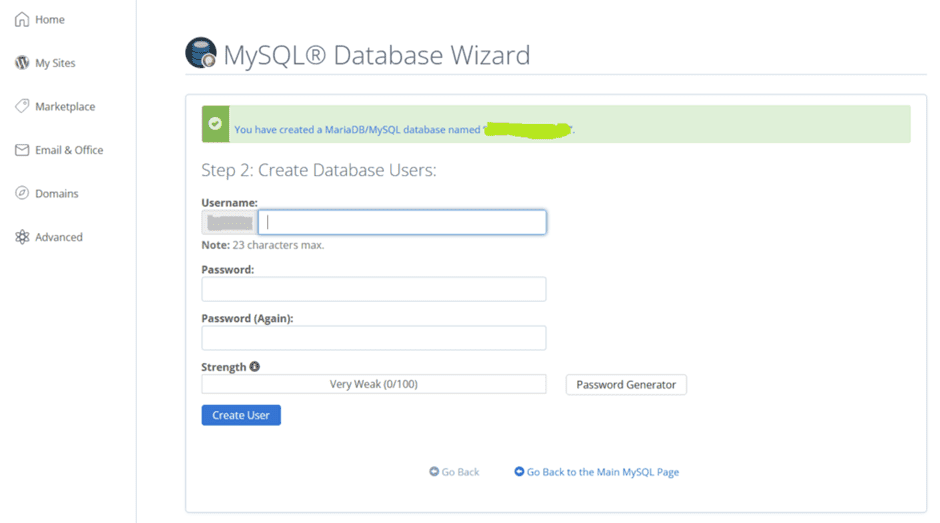
Now your database needs a username and a strong password. If you are scared to remember your username and password, use notepad. Now click on the “Create User” button.
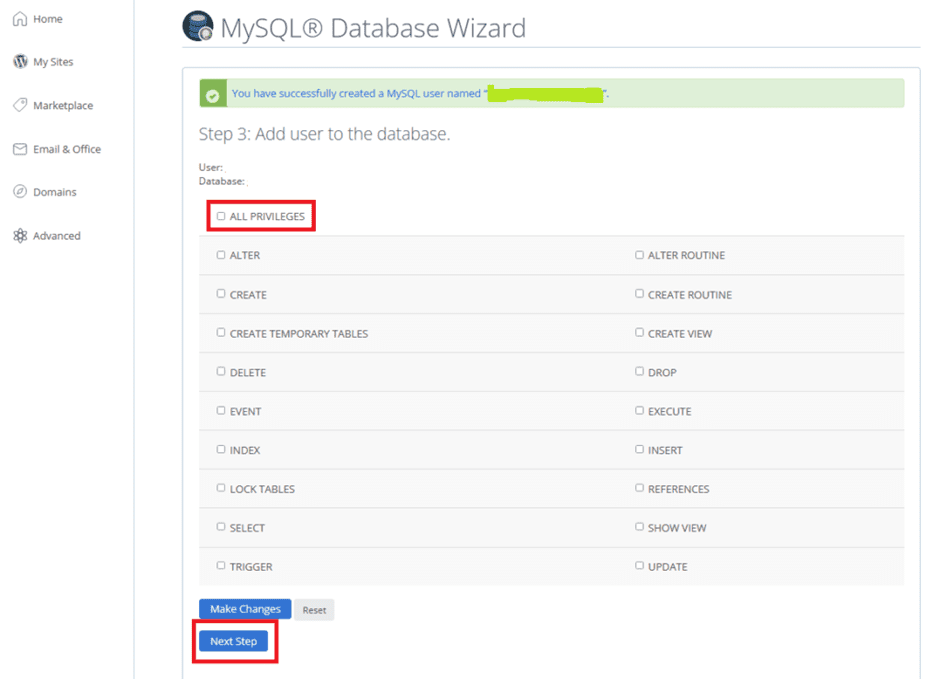
Here you have to permit by clicking “ALL PRIVILEGES.” By this process, you are allowing the user to use the database. Click on the “Next Step” button to move on.
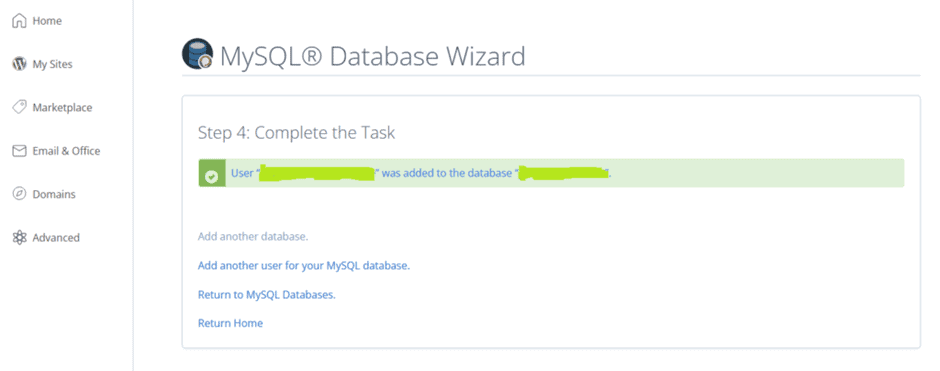
Finally, you have created the database for your new website. Your final database creation will be looked like the screenshot.
How to upload a database on Bluehost?
To upload the database, go to the Bluehost dashboard, click on the “Advanced” tab, and scroll down.
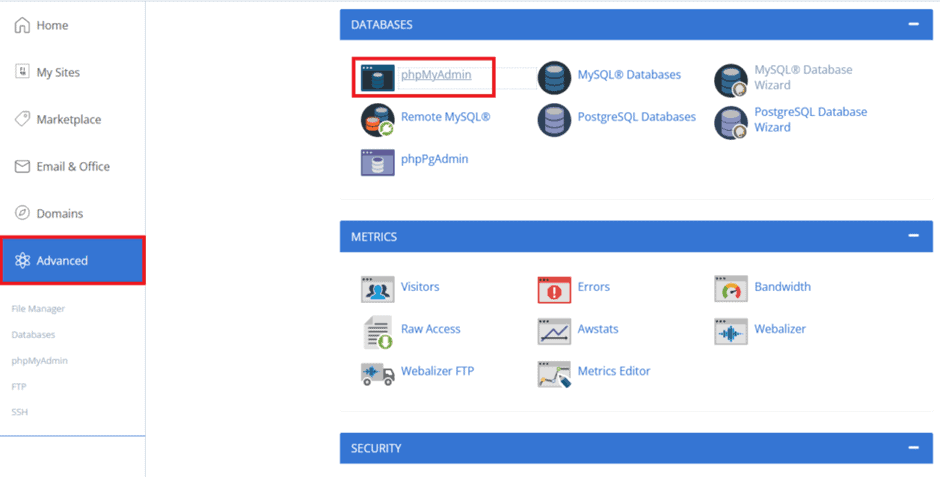
Under the “DATABASES” section, you will see “phpMyAdmin.” Click on that, and you will be redirected to the database upload page.
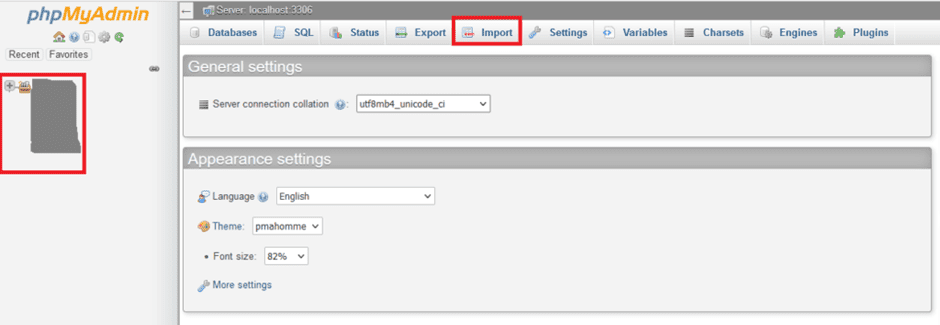
Your database upload page will be looked like the screenshot. From the left side, select the database you have created and click “Import.”
Now choose the file (SQL) you have downloaded from another server. Final and last task, click go, and you are done.
How to upload File manager to Bluehost?
To upload a website file, you have to go back to the Bluehost dashboard and click on the “Advanced” tab.
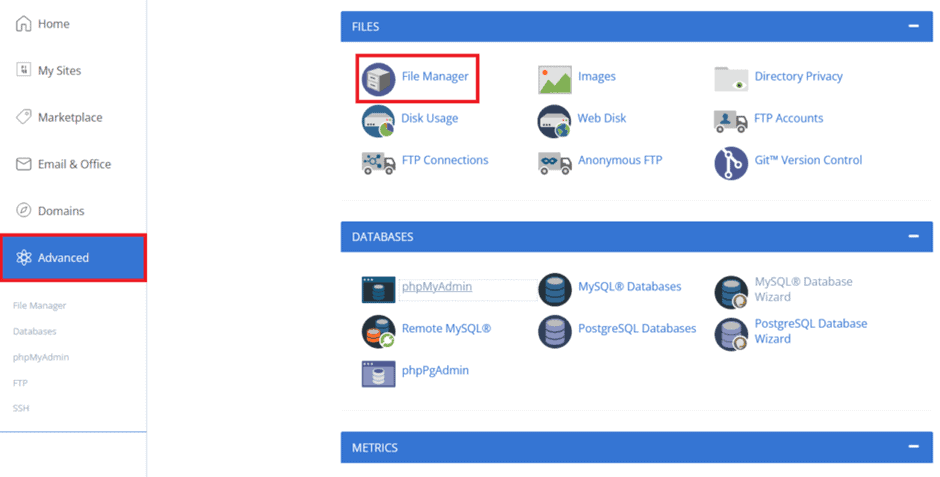
Now scroll down, and you will see “File Manager” click on that.
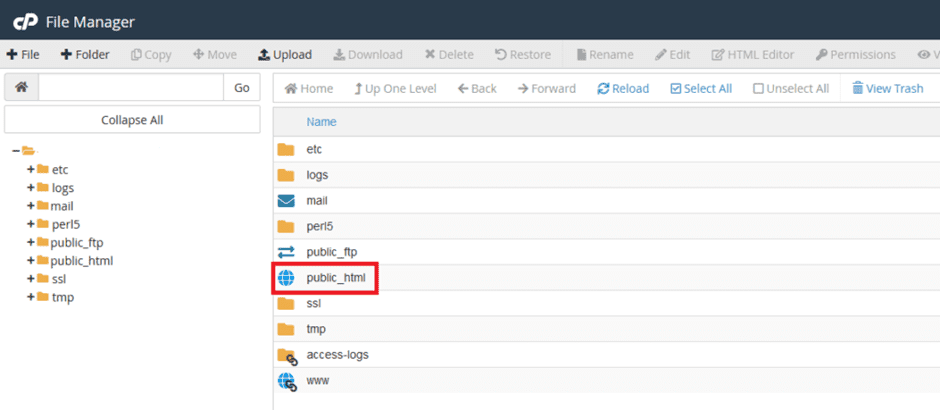
All your website files will be visible in “public_html.” Click to open and then upload.
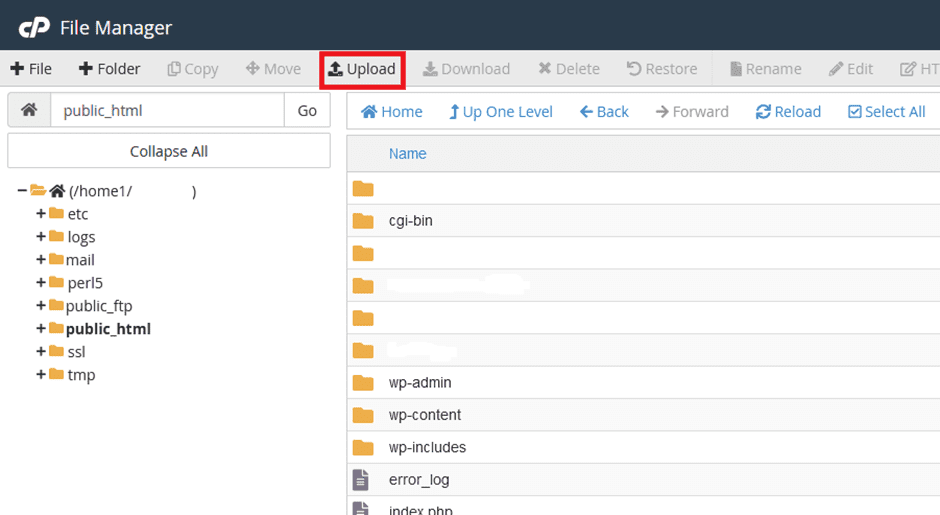
After uploading, remember to extract the zip file. You have uploaded and unzipped your file. So, all your website files are now on Bluehost. It’s time to contact your database with your files.
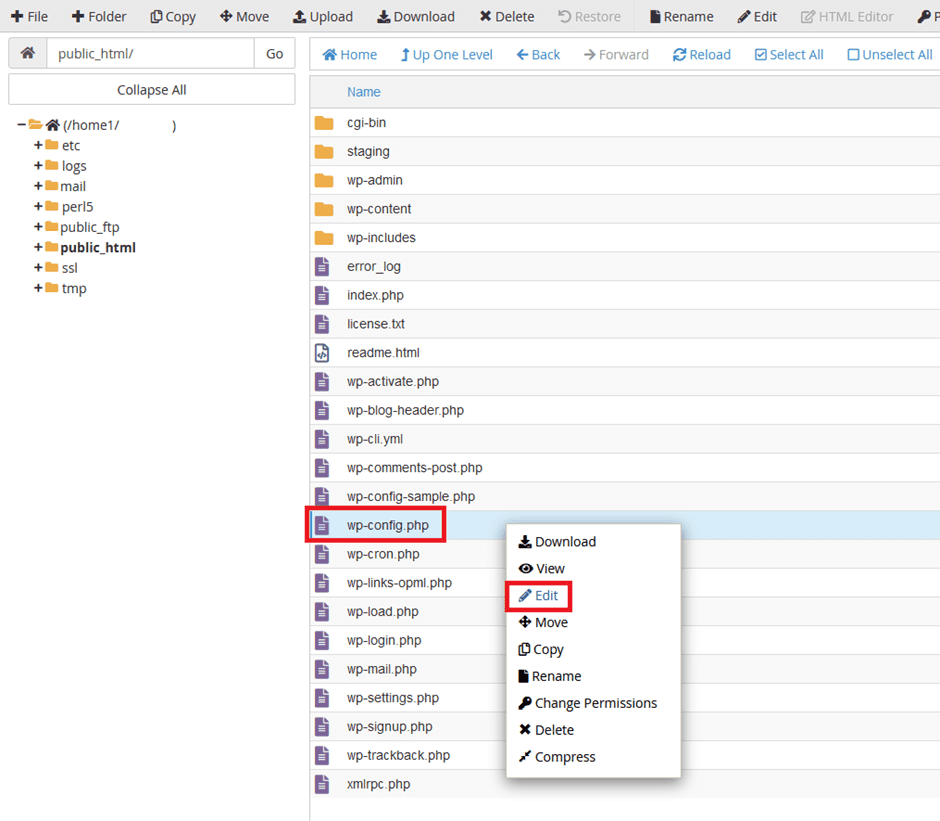
Into your uploaded file, search for “wp-config.php.” To edit the information right, click on the file and then click on the edit option, just like the screenshot.
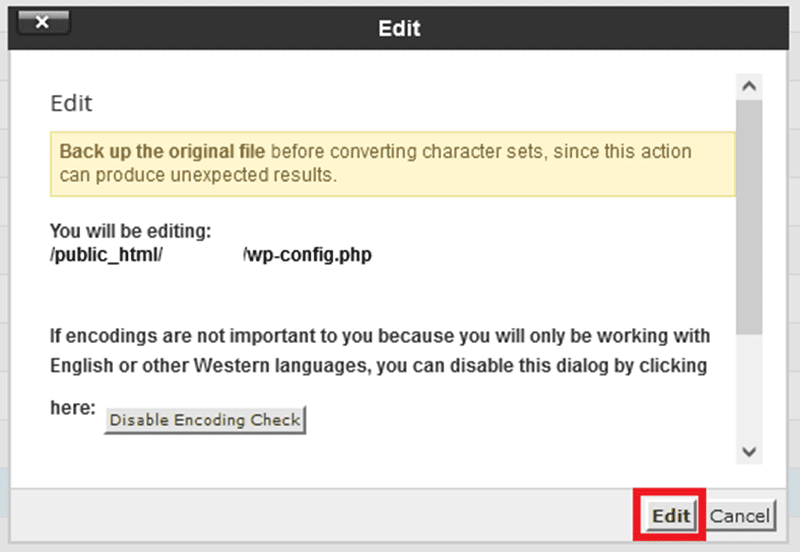
A new window will be opened. Just click on the edit option.
After clicking the edit option, you can see the database information you must change.
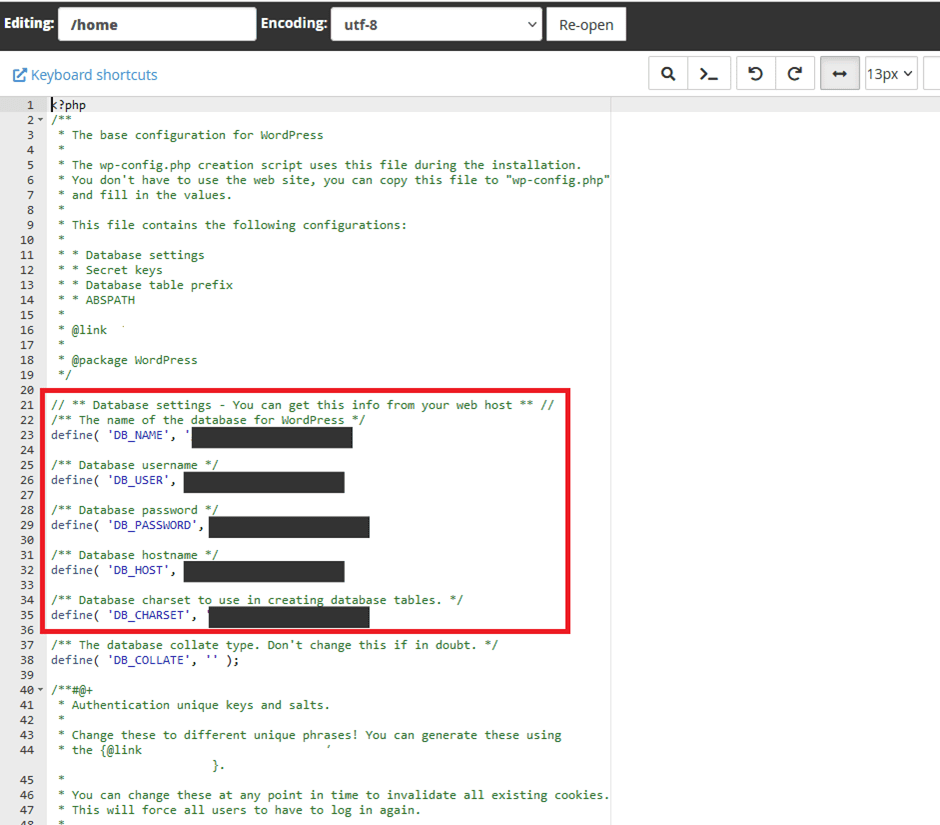
Your database name and password are here. Now change the database name, user information, and password with the newly created database that information you have taken.
Here we are talking about the database information that you have recently created. Everything is done perfectly except for one part, which is the DNS configuration.
Login to your Domain provider and change the DNS with Bluehost. If you don’t know what Bluehost DNS is, you can copy it here.
- ns1.bluehost.com
- ns2.bluehost.com
You have configured the DNS. Congratulation! You have successfully transferred your website without any mistakes. If you are facing any issues, remember to contact us.
Migrate WordPress via FTP Free Bluehost Migration
For exporting the WordPress database and creating the WordPress database on your new Hosting Server, you can follow the universal steps; this process is the same.
Here we will start by transferring Data using FileZilla. Before beginning the process, you must download and install FileZilla on your desktop or Laptop.
Open FileZilla and fill Host, username, and Password options. If you need to know, go to your new hosting account and collect the information.

How to create an FTP account?
If you don’t have an FTP account, in this case, you have to create an FTP account on Bluehost. To do this, click Advanced and then look for the “Files” options, just like the screenshot.
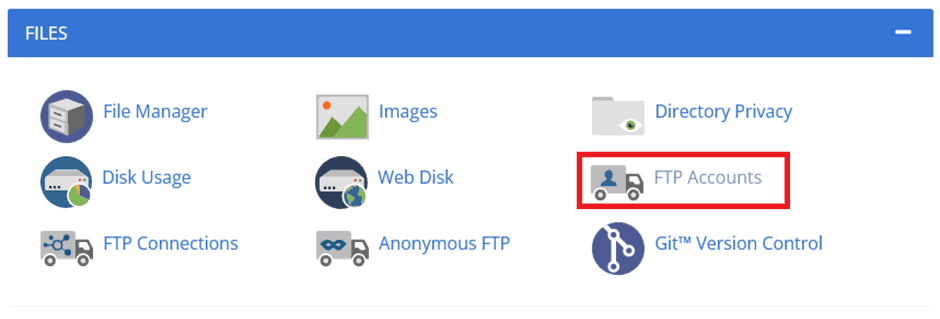
Now click on the FTP accounts and create a new one. To create a new one, you can follow the screenshot.
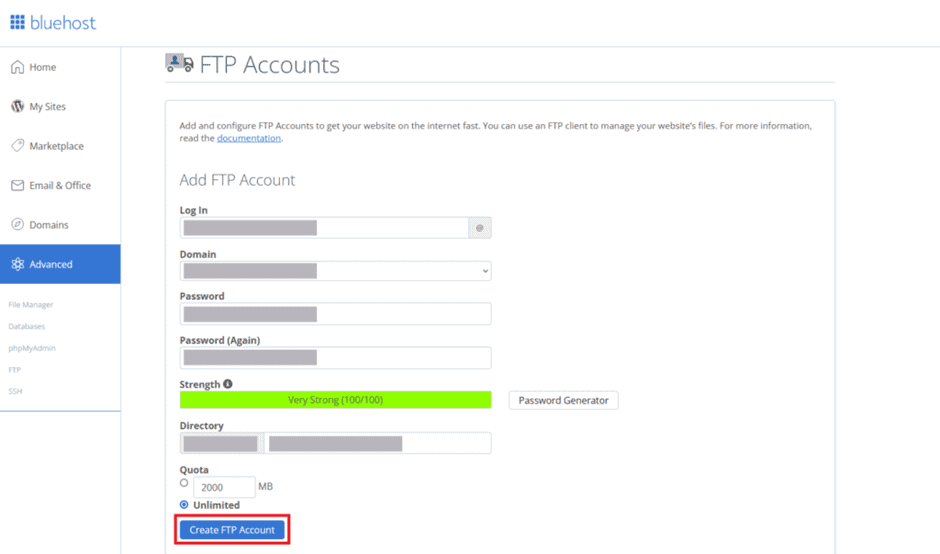
In the Login box, it’s just your name. For example [email protected]
Remember to write down the password you are using here because the password will be used for the FileZilla connection.
After completing all the fillup, click on “Create FTP Account,” and you are done.
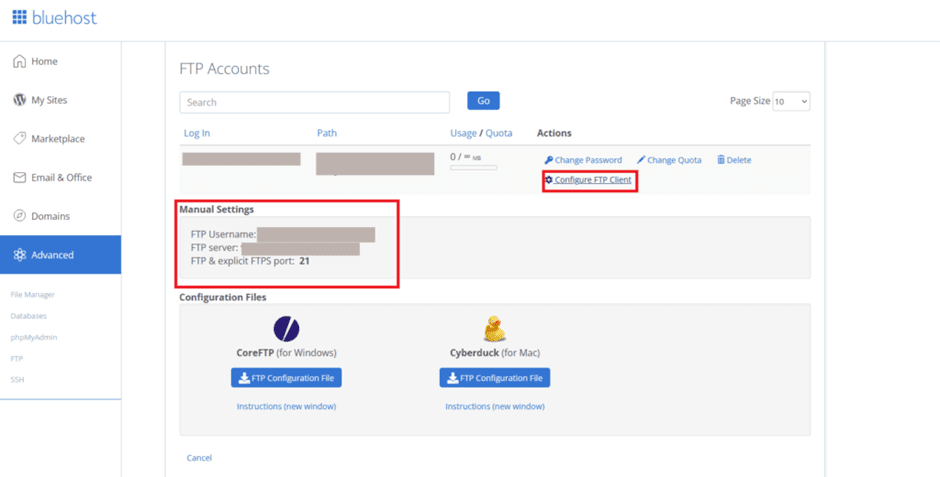
Now scroll down, and you will see your newly created FTP account. For the account you have made now, click on “Configure FTP Client,” and you will see all the information you have to use for the FileZilla connection.
How to connect FileZilla and Bluehost?
Now come back to your FileZilla dashboard and connect FileZilla to the Bluehost using the information that you have recently made. Here you have to use the password you used to create your FTP account.
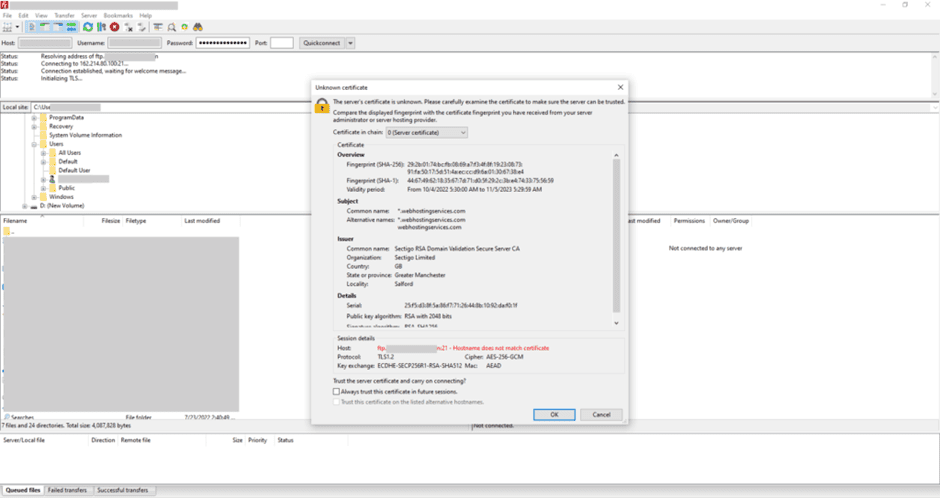
After filling Host, Username and Password, click on “Quickconnect.” A new window will appear; click on ok, and you are connected.
From the left side, drag all your files to the right side.
In FileZilla and your connected server, navigate to the top right window to the file folder containing all your website files. Your main folder should be public_html; all files will appear in the bottom right window.
Upload Database Files To The New Host
To upload your database file, skip the advanced steps. Apply the universal, where we discussed how you could manually create and upload a database.
The last and final process is to change your nameserver.
WordPress migration is easy, but we are making this process complex. Free Bluehost migration comes up with pros and cons. For this, we have discussed both how you can do this with a plugin and how you can do this without a plugin (technically).
However, by taking every step carefully, there are a few chances to make mistakes, but Bluehost professionals are ready to help you.
If you are not comfortable with the plugin or don’t have the option, you can check the technical part. It’s up to you what will do you.
Error: Contact form not found.